Monday 9 February 2015

1 Tshirt 4 Styles No Sewing Required! ;)

OK so, seeing as it's a while since I did any actual blogging let's just keep it simple with this first one and make a simple no sew T-shirt Upcycle, no sewing & only 4 cuts with the scissors, gets you a choice of 4 different styles! Don't believe me? Here's how.

If you want to see the video tutorial, you can click here:
https://www.youtube.com/watch?v=O-rsDPs_EfQ

You will need:
  • Men's T-shirt
  • Scissors
STEP ONE
Take one, oversize men's tshirt with a design you love. I chose the King of Rock n Roll of course! :)

 STEP TWO
Remove the sleeves, collar & bottom hem & that is your 4 cuts! As you can see from the photo I cut the hem in an arch so it hangs nicely when it is on, you could just as easily cut it straight if you prefer.


STEP THREE
Try the top on and make any adjustments to the cut/fit now. This is Style 1 of your top :)


STEP FOUR
Take a piece of the fabric we trimmed from the top earlier and use this to tie up one shoulder of the top. This is style 2.


STEP FIVE
Take another piece of fabric and tie up the other shoulder too :) This is style 3.


STEP SIX
Remove both the shoulder ties and use one piece of fabric to tie up the back two straps, so the top has a racerback style to it. This is style 4.

Ta-da! A few easy steps = 4 stylish looks :)

Head over to my Etsy shop for more cool upcycles :)
www.abidashery.etsy.com


Wednesday 9 April 2014

DIY Step-by-step Sugar Skull Toilet Seat Upcycle :)

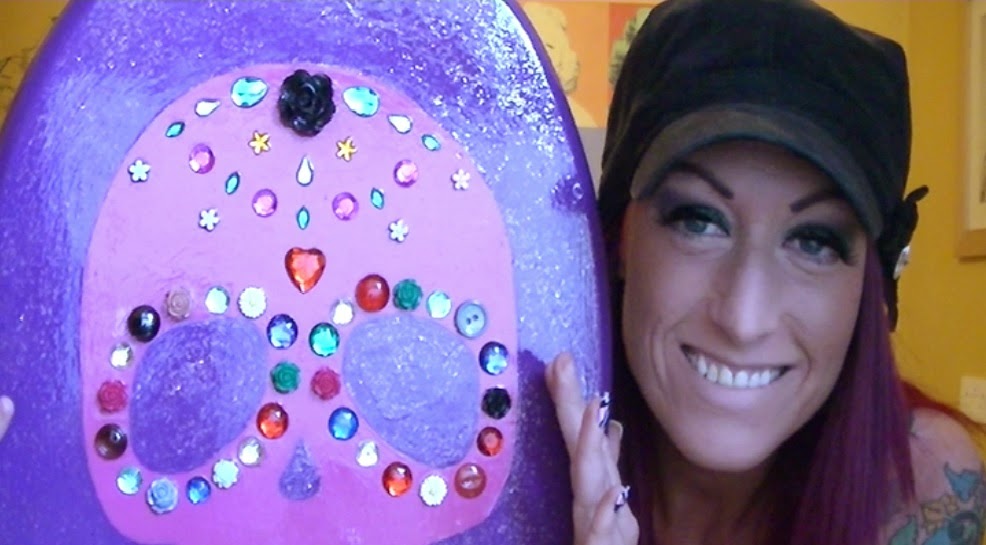
How-to Upcycled Day of the Dead Skull Toilet Seat...remade with love by AbiDashery.

I am absolutely loving all things Day of the Dead at the moment and so a few of my latest projects have had this theme, this project, however is one of my craziest to date so I thought I’d share it with you.

For full video instruction visit: DIY Sugar Skull Toilet Seat Upcycle


Things you will need:

  • Wooden toilet seat (you can buy these for about £10 but mine was my existing wooden toilet seat & I have already painted it once before)
  •  Paint – I use emulsion tester pots coz they come in a vast array of colours and they are soooo cheap, but if you have access or ‘fundage’ for better paints- then go for it!
  • Exterior Varnish – This is important because it needs to be able to withstand damp when it goes to live in the bathroom, again I already had some in the cupboard.
  •  Various beads, gems, resin flower, buttons, stones, jewels etc for decoration – use your imagination.
  •  Sandpaper – just use whatever grade you have handy.
  • Strong glue, I used the E-6000 Glue I use for jewellery making
  •  Glitter Paint (optional) I had some of this already left over from another project so I used it but it         would have still looked fabulous without it.


I had all of this stuff in my art cupboard already; the only money I had to spend was £1 on a new purple tester pot because I had run out. So this has got to be the cheapest up-cycle to date! 

STEP ONE:
If you are using an old toilet seat then remove it, clean it thoroughly & let it dry overnight. Then sand it. I used Wilkinson’s own medium sandpaper because this is what I already had in the cupboard; it’s only to sand a toilet seat so there’s no need to go spending extra cash. Once sanded remove dust with a damp cloth and leave to dry again.

STEP TWO:
First step was to paint the seat purple all over, top and bottom, this takes a while because you’ve got to leave time to dry between coats and you have to let the first side dry completely before it’s safe to turn it over and paint the other side. I did two coats of purple each side in Wilkinson’s own emulsion tester pot in ‘Wizard’ - £1. 

STEP THREE:
Before I could paint the lid I had to draw my skulls outline in pencil, I had already done a sketch of my idea so I thought it wouldn’t be so difficult. It was way harder than I thought it was going to be because it needed to be symmetrical. I drew straight onto the seat with pencil and I rubbed it out and started again about ten times so you definitely need an eraser handy! If I did it again I would fold a piece of A4 paper lengthways paper, and draw half my skull, cut it out and open it to reveal a full skull, which I would then use as a template, so you might want to do it that way.


STEP FOUR:
Paint purple around skull, in middle of eyes, nose etc and leave to dry. Do two coats, let it dry fully then turn it over and paint the underside with two coats too. Leave everything to dry again.


STEP FIVE:
Paint the skull in bright pink. I used Wilkinson’s emulsion tester pot in ‘Hot Gossip’. Give it two coats and leave to dry.

STEP SIX:
This step is optional but I had some old glitter paint left from another project so I gave all the purple parts of the seat a coat of gold glitter, leaving only the pink skull plain. I used Homebase Paint Effects in Gold.

STEP SEVEN:
This is the fun part, once everything is dry,  get out all those beads & buttons I mentioned earlier and arrange them on your skull in a funky Day of the Dead, Sugar Skull type style.
If you’re looking for inspiration you can follow my ‘Mexican Folk Art’ board on Pinterest.


STEP EIGHT:
You’re going to need strong glue for this I used E-600 which I got off eBay for £2.99. It’s really strong stuff though so make sure any little furry creatures are well out of the way and the windows are open. Follow the instructions on the glue and stick all your pretty gems and jewels down and leave in a safe place to dry.


STEP NINE:
This is another time consuming part as all of the toilet seat needs varnishing now. It’s really important you use varnish that withstands damp so I used Wilkinson’s Exterior Clear Varnish which cost £8.99 but I already had some left over from another project. There was 24 hours drying time between coats and longer for it to be completely dry so this did take place over a few days as I did 3 coats all over. My tip for varnishing is to do the thinnest coat possible every time and do 3 coats instead of just two; this should make sure my toilet seat is functional as well as pretty!


So there you have it! How to make a Sugar Skull Toilet Seat for next to nothing! 


If you got this far thanks so much for reading, please leave comments and let me know if you make one, I would love to see it, full video instruction is available on my youtube channel: INSERT LINK and other things made by me can be seen in my Etsy shop INSERT LINK. I am taking commissions if anyone out there wants something similar but doesn’t want to make their own you can email me on www.abidashery@gmail .com or contact me via Etsy.


 Thanks for reading. I hope enjoyed this as much as I did. Full video instructions at: DIY Sugar Skull Toilet Seat Upcycle


Tuesday 8 April 2014

AbiDashery's World

Hello, welcome to my blog, here is a little insight into my world...

For as long as I can remember I’ve gotten an immense thrill from being frugal. Although there have been periods in my life (now being one of them) when this wasn’t an option but a necessity I have still found myself, during times when I have had the money to shop in John Lewis, trawling through the sale rails & bargain bins in the Salvation Army just to find some precious nugget that everyone else has overlooked but that I will fall instantly in love with.  

I like things a little out of the ordinary; I dress for myself first and others second. Every day that I get up and get ready feels like dressing up to me, like getting ready for a tea party when I was a child; in my head I’m just a little girl wandering around in a pink tutu and white tights, magic wand in hand looking for the next adventure. I seem to have a total aversion to knuckling down, doing the 9-5 thing and working for ‘the man’ despite efforts made by others to push me in that direction. I’ve tried and failed at this so many times before and it makes me feel so empty that this time when I lost my job I saw it not as the disaster that some people saw but more the opportunity I had been looking for to finally do what I’ve always wanted to do, what I’ve always really wanted to do.  It dawned on me one morning as I sat drinking coffee, staring into space and wondering how the hell I was going to pick myself up this time, that Shakespeare had been telling me what to do for years in the form of a fridge magnet that my dad brought me back from Stratford, it said simply ‘ABOVE ALL ELSE – TO THINE OWN SELF BE TRUE’ I had read it so many times but never really let its meaning fully penetrate. From that moment on, it was easy and AbiDashery was born. 

I don’t know how my look and style fits in with everyone else, I don’t have a TV, I don’t read newspapers or magazines etc so I don’t follow ‘style’, I just have my style which basically comes down to things I love and feel good in and that’s what I try to reflect in all my creations. I just want to express myself in how I look and it if I can do it cheaply or make it myself then that gives me even more of a sense of delight. Even as a child I can remember being this way, I have memories of watching Charlie and the Chocolate Factory (the Gene Wilder version obviously) and I couldn’t help obsessing over what happened to all those Golden Eggs that didn’t pass the test and went down the ‘bad eggs chute’ I mean, did someone recycle them? Were they made into Golden Egg omelettes? Did they give them away to poor children whose families couldn’t afford Golden Eggs of their own? What happened to them? They looked so perfect and even then as a small girl I couldn’t stand the thought of them just being chucked out. And I still can’t, I have cupboards, boxes, bin liners - even my old bedroom at my dad’s house crammed full of ‘useful things’ that I am definitely going to get round to making something with…some day! I often I find myself stood at the recycling bin turning an egg carton over in my hand and getting misty eyed and I have to remind myself I still have a cupboard full of old jam jars and six bags of unsorted clothes to turn from rags into attire fit for a gothic Cinderella’s ball and I need another egg carton like a hole in the head right now!

So I guess what I’m saying is here at AbiDashery, we do things a little differently and the first rule is there are definitely NO RULES! Every item I make has its own character, its own personal story and each is special for its own odd little reasons - just like we are! And my tutorial videos often wander off into pointless digressions that don't help with what I'm making but do give you a little insight into the real me, and that's kinda how I like it. If you like high fashion, clean lines, easy to follow concise instructions, symmetry and sophistication then I would be surprised if you have read this far but if you like quirky  and unconventional, if you like to stand out from the crowd and want to own something nobody else has that was made with love by someone who cares and loves what they do then this is the place for you and AbiDashery welcomes you.

You can follow my how to videos on my AbiDashery youtube channeland check my store at www.abidashery.etsy.com.